Pages

Friday, November 30, 2012

Holiday Detox Soup

Happy Friday, and happy birthday to my brother Evan! Day 2 with the standing desk was mostly a success. I am definitely sore/tired from ungodly amounts of standing, but I am enjoying the benefits of my new workstation. I absolutely feel more alert standing, and I am constantly aware of my posture and my core. I expect to have superhero health status by the end of next year after 12+ months of paleo, crossfit, and standing while working.  

Today's recipe inspiration comes from my mom. We were talking about recipes, weight loss, and weird fad diets, and she asked me if I had ever heard about the Cabbage Soup diet. I had never heard about this, so I read up on the 7-day meal plan here http://www.cabbage-soup-diet.com/eating-plan/. I definitely have no interest in eating eight bananas with a gallon of milk one day and then 20 oz of beef with 6 tomatoes the next, but the recipe for the "magic" soup looked pretty good. I had never made soup with cabbage, so I figured I would give it a solid try. I tweaked a few things, made it paleo-friendly, and here we are. The soup tastes incredibly fresh and healthy, and it is a perfect addition to my paleo eating plan. I am not expecting to lose 10 pounds in 7 days from this soup, but I will be sure to let you know if it happens!

Ingredients:
- 1 sweet onion, chopped
- 6 green onions (scallions), chopped
- 1 leek, chopped
- 1-2 Tbsp. garlic, chopped
- 2 green peppers, chopped
- 5 medium carrots, chopped
- 1 head of celery, chopped (about 6 stalks)
- 10 oz. of mushrooms, chopped
- 1 small head of cabbage, chopped
- Two 14.5 oz cans of organic diced tomatoes (no junk added)
- 1-2 Tbsp. olive oil
- Black pepper (and any other herbs/spices you want)
- 8 cups organic, low sodium vegetable broth (or homemade stock if you have)

Instructions:
1. Make sure everything is chopped and prepped! Chopping this many veggies can take longer than you may expect, so it is much easier to make this soup if everything is ready to go.
2. Heat the olive oil in your biggest soup pot over medium heat.
3. Add onion, scallions, leek, and garlic. Cook for 5-10 minutes until soft
4. Add peppers, carrots, celery, mushrooms, and cabbage. Cook another 10 minutes, stirring often.
5. Add the broth, your cans of diced tomatoes, and the black pepper and any other spices or herbs.
6. Bring the soup to a boil and then cover the pot, turn the heat to low, and simmer for 2 hours.
7. Forget about weight loss, and just enjoy the soup!

Note: This makes a LOT of soup. Be prepared.


Thursday, November 29, 2012

Eggplant Chips

There was a big change in the McLagan Boston office (aka my home office) today when I converted my desk into a standing workstation. I have been thinking about this for a couple of months since I heard a great lecture at my first paleo meetup about the benefits of standing at work. I hate sitting all day, and I have a huge problem with body parts or entire sections of my body falling asleep from sitting in weird positions or not moving for a long time (sexy? I thought so...). My desk happened to have adjustable legs (thanks Ikea!), so I had no reason not to try it out. It was a bit of a disaster taking everything off the desk and maneuvering it, but it ended up well. My body definitely feels different from standing all day, and it reminds me of the feeling after a long day cooking in the kitchen on my feet. I wore sneakers all day for a little extra padding/support, and I am curious to see how it goes. Luckily tomorrow is Friday, so it is only a two-day standing work week this week! According to the following article (http://ergonomics.about.com/od/office/a/Benefits-of-a-Standing-Desk.htm), my new standing desk should improve my ergonomics, health, focus, mood, and productivity.  I would be ok with any or all of those things!

Today I also attempted round 2 with my dehydrator, and it proved to be much more successful! I attempted to use my mandolin which failed miserably, but I will give that another try next time. I made eggplant chips this time since the slices are so much larger and wouldn't disappear into thin air like the zucchini. The eggplant pieces definitely shrank, but nothing compared to last time. These were a delicious snack, but I am happy and shocked to announce that I didn't eat the whole batch!

Ingredients:
- 1 large eggplant, sliced about 1/4 inch thick
- sea salt, pepper, garlic powder, & paprika

Instructions:
1. Arrange the eggplant slices on the dehydrator trays
2. Season with spices listed above (or any other spices/herbs you want to try)
3. Dehydrate @ 125 degrees for 4-5 hours until desired crispiness is reached


So easy, healthy, and delicious! (and Paleo of course...)

Wednesday, November 28, 2012

Paleo Thanksgiving Turkey

OK, so I know Thanksgiving is almost a week behind us, but I have pounds and pounds of leftover turkey to eat, and I needed to post this recipe. This was my first attempt at making a full turkey, and I was blown away with the result! There is quite a lot to share...

If I focused on the positives, I would tell you that:
  • It tasted amazing
  • It wasn't dry at all
  • I carved it like a pro
  • My dinner guests raved about it
  • The house smelled amazing all day
If I focused on the negatives, I would explain that:
  • I dropped a huge glass bottle of olive oil on the floor when I was elbow-deep in turkey
  • I probably need 5 years of therapy to offset my discovery of the 7 inch neck inside the turkey
  • I sweat as much carving this turkey as I do in my hardest WOD

Clearly the positives outweigh the negatives, and I will definitely be excited (and more prepared) to make another turkey next year! Best of luck to all the first-timers out there!

Ingredients:
- 16 lb. defrosted turkey (get a pastured turkey from your local farm if possible!)
- olive oil
- balsamic vinegar
- 1 bunch rosemary
- 4 lemons, cut into wedges
- Sea salt, pepper, garlic powder, thyme, oregano, and basil

Instructions:
1. Preheat oven to 325 degrees
2. Make sure your turkey is fully defrosted, and then remove it from the package 
3. Time to clean the turkey - if you have disposable rubber gloves, put them on! (wish I could say that I had some...)
4. Thoroughly rinse the turkey (inside and out) with water. You may find a bag of giblets, a 7+ inch neck, and other surprises, so remain calm, and save those pieces for later (soup, gravy, etc.) or immediately throw them out so you don't have to think about it (my choice)
5. When the turkey is cleaned, empty, and trimmed of any strange things (veins, excess skin, etc.), put the turkey in a roasting pan. I highly recommend buying a disposable foil pan to save with post-turkey cleanup. 
6. Generously rub the whole turkey with olive oil and balsamic vinegar, and then cover it with sea salt, pepper, garlic powder, thyme, oregano, and basil.
7. Put all of the lemon wedges and the bunch of rosemary into the center of the turkey.
8. Bake for 4 hours (15 minutes/pound), basting every 30 minutes. Flip the turkey after two hours so both sides get a nice golden brown color.
9. Take the turkey out of the oven, cover tightly with foil, and then let it sit for 30 minutes.
10. Carve like your uncle taught you!

Note: Since there was no real sauce or heavy marinade, there was next to no juice to baste the turkey with after the first 30 minutes. I re-brushed some oil and vinegar on the outside to keep it moist. By the second round of basting, there was plenty of liquid from the lemons and the natural juices from the turkey.


Paleo Macaroons


I really should be sleeping right now, but I have too many ideas and thoughts racing through my head. My IIN program is teaching the importance of holistic health and happiness, and while nutrition (paleo for me) is a huge factor in my overall wellness, there are so many other aspects of life that require just as much attention and nurturing. Tonight's recipe is the other Thanksgiving dessert I made last week which was inspired by Elana's Pantry blog entry for gluten free coconut macaroons. To keep the Thanksgiving theme alive for a little longer, I want to share the things I am thankful for today:

1. Meaningful connections with new friends
2. Closure
3. Excitement about the unknown
4. Amazing stories
5. Beautiful (non-coincidental) signs from the universe

In terms of my holistic health, today has been a wonderful day. Looking forward to all those ahead. In the meantime, make some paleo macaroons ;)  


Ingredients:
- 6 egg whites
- 1/4 tsp. fine sea salt
- 1/2 cup raw organic honey
- 1 Tbsp. vanilla extract
- 3 cups unsweetened shredded coconut

Instructions:
1. Preheat oven to 350 degrees 
2. Whisk egg whites and salt thoroughly (at least 5 minutes)
3. Add honey and vanilla, and whisk until well combined
4. Fold in coconut
5. Drop rounded tablespoons of batter onto a baking sheet lined with parchment paper
6. Bake for 17-22 minutes until lightly browned

Note: The original recipe says this should make 48 macaroons, but mine made exactly 24, and I used an actual tablespoon to measure. I definitely recommend doubling the recipe if you need to feed a large crowd!

Monday, November 26, 2012

Pomegranate Pecan Brussel Sprouts


My first memory of brussel sprouts was when my mom used to steam them in the microwave when I was a young kid, and the whole house would smell like sewage. I never understood how anyone could even taste such a foul-smelling food. Later in life I realized how amazing brussel sprouts are if you just roast them in the oven. I am still not sure what my mom was thinking back then, but the good news is that she roasts them now too! I can't get enough of these this year; at last night's Thanksgiving potluck, Chris made delicious roasted brussel sprouts with parsnips. It was such a great combination of flavors, and I will absolutely make those together soon. Last week on Thanksgiving, I wanted to make a sweet and savory side dish, so I decided on roasted brussel sprouts with toasted pecans and fresh pomegranate seeds. This was probably one of my favorite creations to date! Sorry to mom and Aunt Randi for giving them stomach aches for making such a delicious side dish... I didn't mean for them to eat so many!


Ingredients:
- A lot of brussel sprouts (filled up two 9x11 pans)
- Seeds from 2 pomegranates
- 1 cup chopped pecans
- Olive oil
- Sea salt, pepper, & garlic powder

Instructions:
1. Preheat oven to 400 degrees (convection if you have it)
2. Wash brussel sprouts, cut off the ends, and cut in half (keep all the leaves that fall off - these are the best part!)
3. Put the sprouts in a baking dish, and drizzle with olive oil, salt, pepper, and garlic powder. Toss until well combined.
4. Add pecans to the sprouts and mix
5. Bake for 20-30 minutes depending on your crispiness preference, stirring every 5-10 minutes
6. When sprouts come out of the oven, mix in the pomegranate seeds, and serve immediately


Sunday, November 25, 2012

Paleo Brownies

It is officially Thanksgiving round 2 today! Chris and I have had quite the afternoon tending to the turkey for our paleo potluck feast tonight. My first experience prepping a turkey was certainly an interesting one. I got some much-needed advice from Mom and Aunt Randi beforehand, but nothing could have truly prepared me. I will spare you the gory details, but let's just say I was mortified when I "discovered" the neck hanging out in the inside of the turkey. The only other disaster was when I dropped an entire glass bottle of olive oil on the floor and glass and oil went everywhere. Mom nicknamed me "Helpful Hannah" for a reason, and I have a feeling that will stick with me for a while. The good news is that the floor is cleaned, the house smells amazing, and in about an hour, my first attempt at a (paleo) turkey will be done! I will post the recipe later this week. You all may be detoxing from turkey recipes for now, but there is always next year!

In the meantime, you can check out this recipe inspired by The Wannabe Chef's almond flour brownies with some paleo tweaks. I made these for Thanksgiving with my family. They were definitely a hit, and my non-paleo family members recommended these warm brownies with a scoop of ice cream to pump up the sweetness that they are used to. These brownies are very rich and absolutely will satisfy your sugar/dairy/gluten-free chocolate cravings! 

Ingredients:
- 3/4 cup almond flour
- 1/4 tsp. salt
- 2 Tbsp. unsweetened cocoa powder
- 1/2 tsp. baking powder
- 2/3 cup raw organic honey
- 3 eggs
- 1 tsp. vanilla
- 1/2 cup coconut oil
- 4 oz. unsweetened baking chocolate squares
- 1/2 - 1 cup chopped walnuts (optional)

Instructions:
1. Preheat oven to 350 degrees
2. Mix almond flour, salt, cocoa powder, and baking powder
3. In a separate bowl, melt the 4 ounces of baking chocolate with the coconut oil
4. While chocolate melts, beat eggs, honey, and vanilla in a separate bowl
5. Slowly add the melted chocolate mixture to the egg mixture. Whisk thoroughly, and make sure to add slowly so the eggs don't start to cook
6. Add the dry ingredients to the bowl as well, and mix completely
7. Fold in walnuts if using nuts
8. Pour the batter into a greased 8x8 pan
9. Bake for 30 minutes until a toothpick comes out clean. Let cool completely, and then slice and serve!


Saturday, November 24, 2012

Butternut Squash Casserole

Happy (belated) Thanksgiving! There is a lot to catch up on - I am back in Boston after a few wonderful days with my family. It was so great to see everyone as always, and I feel very thankful to have such an incredible family. 

This was my first Paleo thanksgiving, so it was quite different from a food perspective this year. I had to pass on the stuffing, stuffed mushrooms, mac & cheese, cornbread, marshmallow sweet potatoes, and about 500 desserts, but I made some great paleo-friendly recipes and was able to focus more on the real meaning of thanksgiving. Recipes will be posted all week, and the first one is a quick and easy butternut squash casserole. I am cooking a mini round 2 paleo thanksgiving tomorrow, and I will be serving the leftovers of this along with my first attempt at a turkey. Details will follow... enjoy!

Ingredients:
- 5 lbs butternut squash, cubed
- 1-2 Tbsp. coconut oil
- 1 cup shredded unsweetened coconut (plus more for dusting)
- Sea salt, pepper, garlic, powder, & cinnamon
- 1 cup chopped walnuts

Ingredients:
1. Preheat oven to 375 degrees
2. Boil squash for 20-30 minutes until soft
3. Drain squash in a colander 
4. Add coconut oil to pot and let melt. 
5. Add squash and shredded coconut to the pot with the coconut oil, and mix with a hand blender
6. Add salt, pepper, garlic powder, and cinnamon to taste (I like a lot of cinnamon!)
7. Put pureed squash in a casserole pan, and then top with chopped walnuts and some extra shredded coconut and cinnamon
8. Bake for 40 minutes. If nuts start browning, you can cover the pan with foil for the last 10-15 minutes.


Monday, November 19, 2012

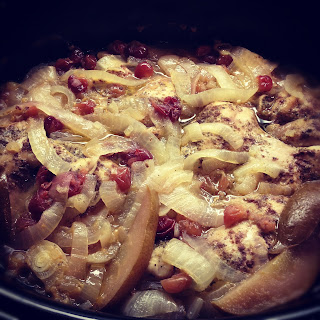
Fall Harvest Crockpot Chicken w/ Butternut Squash, Cranberries, & Pears


Only three days left until Thanksgiving, and I can't wait! This week has been so fantastic with visits from Kelsey (hadn't seen her in 13 years!), Sarah & Mark, Mal tonight, and the Rozier/Topche crew on Wednesday. So many wonderful people to see, so little time! I am very much in the Thanksgiving spirit and created this great Fall recipe with locally sourced ingredients. You can pick up all of these ingredients from your local farmers market and throw it together in no time in the crockpot. You can make this recipe with or without broth. I went with broth this time to get a slighty soupy experience. Next time I am going to make this as a roasted dish in the oven to get everything nice and crispy. The part II version will be after Thanksgiving (and after I buy myself a dutch oven!). This will be Mal's welcome meal when she arrives from Ithaca tonight after a six hour drive. A little fall harvest crockpot chicken and some wannabe rice pudding, and we will be back in business! Only four more hours to go...

Ingredients:
- 1 butternut squash (1.5 lbs.), cubed
- 1 sweet onion, sliced
- 1 bosc pear, sliced
- 1 cup raw cranberries
- 1.5 lbs boneless, skinless chicken thighs
- 1 cup veggie or chicken broth (optional)
- 2 bay leaves
- Sea salt, pepper, garlic powder, and cinnamon

Instructions:
1. Layer squash cubes at the bottom of the crockpot.
2. Put half of the onions, pears, and cranberries on top. 
3. Add 1 bay leaf and some spices
4. Arrange a layer of chicken on top of the spices
5. Add another layer of spices and the second bay leaf on top of the chicken
6. Add the remaining onion, pear, and cranberries
7. Pour the broth over the mixture (this isn't necessary - I like it because it makes it a little bit soupy) 
8. Cook on high for 3 hours and then low for 90 minutes


Sunday, November 18, 2012

Paleo Chia Pudding


 24 hours until Mal's arrival! We haven't seen each other since July, so this reunion is long overdue. Mal hasn't even seen me since I started my paleo transformation, so she hasn't had the pleasure of tasting any of my new creations. I wanted to make sure she gets fed well when she arrives, so I cooked a great crockpot chicken recipe that I will post tomorrow, and I did my best attempt at "Rice Pudding" paleo style which is really chia seed coconut pudding. Back in the day in Stamford, Mal and I used to eat rice pudding every night after dinner together, so I thought I would finally try to recreate our favorite treat. The recipe is inspired from Deliciously Organic, and it came out great. The texture and flavor differ quite a bit from your standard rice pudding, but this is a simple and delicious dessert good for ice cream and rice pudding lovers like me!

Ingredients:
- 1 can coconut milk
- 1 Tbsp. vanilla
- 2 Tbsp. organic maple syrup
- 1/3 cup chia seeds

Instructions:
1. Whisk together coconut milk, vanilla, and syrup until well combined
2. Add chia seeds, and stir consistently for a few minutes so all seeds are coated
3. Let sit for 1-2 hours so the seeds can expand in the liquid. 
4. If you prefer it cold (I do), stick the mixture in the fridge or freezer. Note that this will significantly harden the pudding since the coconut milk solidifies at cold temperatures.


Saturday, November 17, 2012

Paleo Coconut Bread

OK people - we officially have the mystery of a lifetime. You know the whole OJ Simpson debacle? Well, this isn't exactly the same, but it is equally thrilling. I woke up this morning and noticed a box on my counter from Amazon when I went to get a glass of water. I am assuming my roommate saw it in the lobby and put it there for me. I opened the box and found this cut resistant glove with "maximum protection for employees who cut meat or fish". There was no note, no receipt, no trail of anything. There are only a few people who could have sent this:

1. Ryan - After he sent me the dehydrator, I bought a mandolin, and he is convinced I will sever my hand or at least a few fingers any day now.
2. Evan - He has the perfect sense of humor and has made me crazy with mystery things like this in the past (anyone remember the Scottish voicemail fiasco?!)
3. Steph - She sliced open her hand cutting a bagel on a winter day when we were young, and then proceeded to wave her hand around screaming getting blood everywhere. After that, cutting safety has been a key focal point in our friendship. 
4. Mom - She knows that she somehow raised the clumsiest daughter imaginable, and she is always looking out for my well-being. By the way mom, I am still really sorry about dropping that entire gallon of milk on the kitchen floor!
5. An unknown coworker - I am getting a lot of heat in Stamford for being "Sooo Paleo", so maybe someone is just giving me a hard time...
6. Mal - The list wouldn't be complete without her. I don't think it's her, but she knows me the best and would clearly see the benefits of such a practical gift.

If anyone and I mean anyone has information about this mysterious cut-resistant glove that appeared in my kitchen this morning, please contact me immediately!!

On a very unrelated note, I attempted to make some paleo bread yesterday after watching Ryan make an awesome loaf of bread in Dubai. Some may say I am competitive, but I like to think that I just wanted to get in on the excitement. This bread is interesting... it tastes good, but it has a very unique texture. Picture a dog eating peanut butter smacking its tongue against its mouth and then picture me doing that eating this bread. That pretty much sums it up. With a little almond butter and jam (neither of which I had), this would be fantastic. I will probably tweak this recipe and play with it a bit, but this definitely is a nice breakfast/side bread for anyone looking for a paleo or low carb substitute. 

Ingredients:
- 3/4 cup coconut flour
- 1/2 cup melted coconut oil
- 6 eggs or 3/4 cup egg whites (I used the whites)
- 1/4 cup unsweetened coconut flakes (optional)
- 1/2 tsp sea salt
- 1/2 tsp baking soda
- 1/2 tsp cinnamon (optional)

Instructions:
1. Preheat oven to 350 degrees
2. Mix all ingredients in a bowl (use your hands at the end so it becomes more dough-like)
3. Put dough in a greased loaf pan
4. Bake 30-35 minutes until lightly brown (note - this bread will hardly rise)


Thursday, November 15, 2012

The Health Coach Revolution

Have you heard about the health coach revolution? If not, check this out... http://www.wellandgoodnyc.com/2012/11/15/the-coming-of-the-health-coach-revolution/# I am proud to announce that I am three weeks into the Institute for Integrative Nutrition (IIN) program, and it has been a fabulous experience so far. The program is extremely flexible, so I am able to get all of the reading and assignments done on nights and weekends while still working full-time. I have done a lot of unofficial health and wellness coaching over the years (meal plans, workout programs, emotional healing, etc.), and I finally decided to dive into the world that I have always been so passionate about. The best parts so far have been meeting enthusiastic, like-minded people and taking a deep-dive look at my own life and treating myself as my first official client. In a matter of a few short weeks, I have already felt the benefits. 

One of the things I am tasked with is to complete some health history sessions with prospective clients (or friends/family that want to help!). If anyone is curious, definitely shoot me an email or leave a comment. You will have a chance to fill out a simple health history form (everything is confidential), and then we will discuss things relating to sleep habits, nutrition, cooking habits, family health history, and overall wellness. I need to practice as many of these as possible, so don't be shy!

On an unrelated note, I woke up this morning to the best email from my aunt:

Ms. Paleo:

What can I prepare for you for Thanksgiving?

Yours truly,
Ms. Veg


I hope that all paleo people with non-paleo families are as lucky as I am! My vegetarian aunt couldn't be more accommodating, and I am counting down the days until thanksgiving.  I am planning on making a brussel sprout dish with pomegranate seeds and toasted nuts inspired by my new favorite restaurant The Gallows along with some sort of squash/coconut casserole. For dessert there will probably be an apple pie/crisp and maybe a paleo cookie/bar of sorts. Stay tuned for all of the recipes!

Wednesday, November 14, 2012

Frittatas 3 Ways

On the road again! It is that time of year with a lot of travel, so tons of eating out and not a lot of home cooked meals over the past few days. Paleo on the road has luckily become second nature, and I always plan some backup snacks/meals just in case. As I was packing up my stuff at work today to head back up to Boston, Steve came into my office and asked why I had a can of cat food in my suitcase. While he should clearly know better not to be looking in a female colleague's suitcase, he totally caught me - it wasn't cat food, but I did have an "emergency" can of wild salmon just in case I was unable to get a paleo meal throughout my travels. The moral of the story is that you can never be too prepared, but you also need to be willing to take a little heat from your not so paleo friends! 

I have experimented with a ton of frittata / egg casserole recipes, and tonight I am sharing three that I made in my first month or two of experimenting with paleo. They each make enough for five solid servings, so it is the perfect thing to make Sunday night and have five quick and easy breakfasts for the work week. The possibilities are endless, but here is a trio of recipes to get the wheels turning. Enjoy!


Mushroom & Onion Frittata 

Ingredients:
- 1 carton egg whites or 10-12 eggs, beaten
- 16 oz. mushrooms, chopped
- 1 large sweet onion, sliced & chopped
- 1 Tbsp. coconut oil
- Salt, pepper, & garlic powder

Instructions:
1. Preheat oven to 375 degrees
2. Saute onion and spices in melted coconut oil over medium heat until soft (7-10 minutes)
3. Add mushrooms and cook another 5 minutes
4. Pour into greased 9x12 casserole pan, top with eggs of choice, and cook for 30 minutes or until set.

Kale, Pepper, & Asparagus Frittata w/ Avocado

Ingredients:
- 1 carton egg whites or 10-12 eggs, beaten
- 1-2 cups kale, stems removed
- 1 red pepper, chopped
- 1 bunch asparagus
- 1 Tbsp. coconut oil
- Salt, pepper, & garlic powder
- 1 avocado 


Instructions:
1. Preheat oven to 375 degrees
2. Saute kale, pepper, asparagus, and spices in melted coconut oil over medium heat until soft (7-10 minutes)
3. Add mushrooms and cook another 5 minutes
4. Pour veggies into greased 9x12 casserole pan, top with eggs, and cook for 30 minutes or until set
5. Top with sliced avocado

Sweet Potato, Spinach, & Onion Frittata w/ Grass-Fed Ground Beef

Ingredients:
- 1 carton egg whites or 10-12 eggs, beaten
- 1lb. grass-fed ground beef
- 2 small-medium sweet potatoes, chopped
- 2 cups+ spinach
- 1 large sweet onion, sliced & chopped
- 1 Tbsp. coconut oil
- Salt, pepper, & garlic powder


Instructions:
1. Preheat oven to 375 degrees
2. Cook ground beef over medium heat
3. In a separate pan, saute onion, sweet potato, and spices in melted coconut oil over medium heat until soft (10-15 minutes)
4. Add spinach and cook another 2-3 minutes until soft
5. Pour drained meat into a greased 9x12 casserole pan, cover with the veggie mixture, top with eggs, and cook for 30 minutes or until set
Note: For those who don't want ground beef for breakfast, this version makes a perfect lunch or dinner!

Sunday, November 11, 2012

Roasted Delicata Squash

Thank you, thank you, thank you to the random woman at the farmer's market who told me how delicious delicata squash is. She was an innocent shopper and just thought I should know that delicata squash is "reliably sweet" and never disappoints. She said to cut it, scoop the seeds, and then roast slices with the skin on. I couldn't say no, so I bought two squash and tried it out. This recipe will make your kitchen smell like cinnamon heaven in less than five minutes of cooking time. Leaving the skin on gives it a unique crunch, and this is by far my new favorite squash. Kids (and adults) will love eating this as a snack, and if you are paleo like me and avoid sugar, this hands down can be eaten as dessert. I will definitely pick up a few more next week to roast for Mal when she comes to visit! Counting down the days...

Side note - I just finished an amazing interview with Jordan Brown, the CEO/Founder of Hu Kitchen in NYC. Stay tuned later this week for the interview!

Ingredients:
- 2 medium delicata squash
- 1 Tbsp. coconut oil
- Cinnamon
- Dash of salt and pepper

Instructions:
1. Preheat oven to 450 degrees
2. Wash squash and cut vertically
3. Scoop out seeds
4. Slice into 1/2-inch pieces, and arrange on a foil-lined baking sheet
5. Melt coconut oil and brush the tops of the squash lightly with the oil
6. Season generously with cinnamon, and add a small sprinkle of salt and pepper
7. Flip the squash and repeat steps 5&6 on the other side
8. Bake for 25 minutes, flipping squash half way. They should smell super sweet and be nice and crisp on both sides. You eat the entire thing (including the skin) - you will not be disappointed with these!


Saturday, November 10, 2012

Grass-Fed Standing Rib Roast


 Today's recipe is a long-time favorite for my family: a standing rib roast. To add the paleo effect, I got a grass-fed rib roast from the John Crow Farm stand at the opening day of the winter's farmers market in Jamaica Plain. I ventured out to JP with my new friend Salin (thanks to Sanjida for introducing us!) to check out the market. Sadly, SOWA isn't hosting an indoor winter market this year, so I am going to have to check out all the others in the area. The Egleston Market was much smaller than what I'm used to at SOWA, but it did the job. The market was inside a little church, and there was a parking lot with free parking next door. There were two farm stands, two meat vendors, a few specialty vendors (cheeses, honey, cupcakes, etc.), and a section doing bike tune-ups and repairs. We bought some fresh broccoli and butternut squash along with the meat to cook a little feast. This meal was good enough to serve for the holidays. My entire house smelled like crispy roasted garlic just like my mom used to make it. It couldn't have been easier to make or more delicious to eat. If you ever want to impress a meat-lover, this is the recipe to do it!

Paleo Grass-Fed Standing Rib Roast
Ingredients:
- 3lb. standing rib roast (2 bones) - this feeds about 4 people
- loads of crushed garlic (about 4 heaping tablespoons)
- sea salt and pepper

Instructions:
1. Let roast sit out on the counter for about 1 hour to bring to room temperature
2. Preheat the oven to 450 degrees
3. Rub the roast with crushed garlic (about a tablespoon per side) - don't be shy!
4. Season generously with salt and pepper on all sides
5. Bake for 20 minutes at 450 then turn oven down to 350 and cook for another 70 minutes for medium rare
6. Take roast out and let sit uncovered for 25 minutes
7. Slice and drool with anticipation!


Mashed Butternut Squash
Ingredients:
- 1 extra large or 2 medium butternut squash (about 4 lbs.)
- 1 Tbsp. coconut oil
- Cinnamon, salt, pepper and garlic powder

Instructions:
1. Boil big pot of water
2. Wash, peel, and cube squash
3. Boil for 20 minutes until tender
4. Drain squash and mash with a potato masher or with your immersion blender
5. Add coconut oil and spices to taste (I did heavy on the cinnamon and light on the salt/pepper/garlic)


Roasted Broccoli
Ingredients:
- 1 large head of broccoli
- splash of olive oil
- salt, pepper and garlic powder

Instructions:
1. Preheat oven to 375 degrees
2. Wash and chop broccoli
3. Put broccoli in ziploc bag or bowl and add olive oil and seasonings
4. Shake/mix to evenly coat, and put on a foil-lined pan
5. Bake for 15-20 minutes for desired crispiness

Thursday, November 8, 2012

Paleo Veggie Chips!


It's official! I received my first birthday present for 2012. While my 27th birthday isn't for another 27 days (ironic?), I was thrilled to come back from a work trip and unwrap this exciting gift. Thanks to Ryan, I am now a proud owner of an Excalibur 2400 Food Dehydrator (yes, every little girl's dream). It sort of looks like a hardcore VCR/8-track from the 80s, but in reality, it is a magic machine that will now allow me to make my own dried mango, grass-fed jerky, veggie chips, and more! I was dying to try it out, so for the first recipe, I tried some simple zucchini and summer squash "chips". They took less than 10 minutes to prep, and when I came back from crossfit and peaked inside the machine, I couldn't stop laughing because the chips were TINY. The pictures at the bottom show the size of the chips, and that plate of chips is a small salad plate and has the entire batch that was created from a whole zucchini and squash (excluding any I may have tasted along the way...). These tiny little midget chips were adorable and delicious, and now I will almost certainly need to buy a mandolin. I am known to be quite clumsy, so mandolins scare me (a lot), but I think it is essential for becoming a dehydrating queen. By the way, if you think calling myself a dehydrating queen is lame, you are probably right, but it isn't going to stop me!

 Ingredients:
- 1 zucchini
- 1 summer squash
- splash of olive oil
- Sea salt, pepper, garlic powder, & dried herbs of choice

Instructions:
1. Wash veggies, and slice with food processor or (carefully) with a mandolin
2. Put veggies in a ziploc bag or a bowl to mix, and add olive oil and spices
3. Mix thoroughly and then arrange on the dehydration trays
4. Cook at 130 degrees for 4-6 hours depending on thickness
5. Eat them all! Note: this step doesn't last long since the chips belong in a miniature dollhouse...


P.S. That zucchini ring is not a wannabe wedding ring; it is just strategically placed to see the size/scale of the chips! However, this does make me wonder about making a new line of jewelry to be sold at farmers markets across the country...